BatchWarp
For Warp Stabilizer
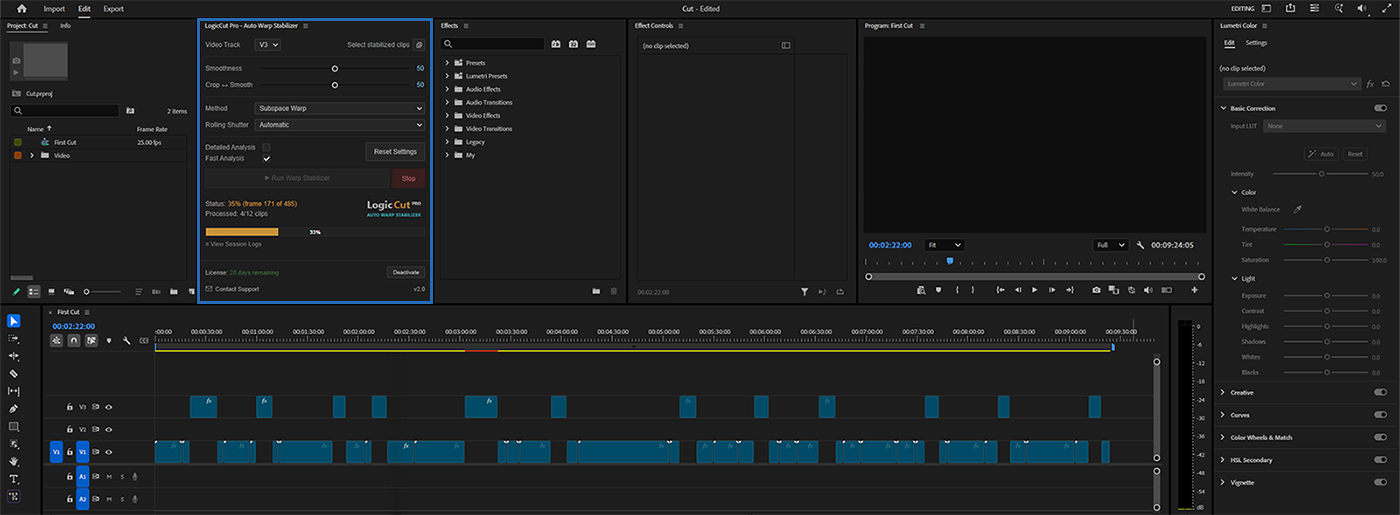
Automate Premiere Pro’s native Warp Stabilizer across full tracks or selected clips. Start it, walk away, and come back to a saved timeline with detailed logs.
Built for Video Editors
The hours you spent stabilizing clips manually?
GONE
BatchWarp handles your entire timeline automatically.
One-Click Batch Stabilization
Simply select your unstable clips anywhere on the timeline or place them on a dedicated track, hit Run. BatchWarp applies Warp Stabilizer to every clip automatically — no manual effect dragging.
Sequential Analysis
Each clip is analyzed in order. If an issue occurs, BatchWarp retries automatically — if it still can't process a clip, it skips it, logs the error, and moves on.
Set & Forget
Start the process and walk away. BatchWarp works through your entire track while you handle other tasks — no babysitting required.
Full Settings Control
Fine-tune Smoothness, Crop ratio, Stabilization Method (Subspace Warp, Position, or Perspective), Rolling Shutter correction, and Analysis mode — all before hitting Run.
Auto-Save on Completion
When the last clip is processed, your project is automatically saved. Come back to a clean, finished timeline.
Built for Heavy Workflows
Feature films, music videos, wedding cinematography — if your timeline runs long and your clip count runs high, BatchWarp was built for exactly that.
Everything You Need to Know
A complete guide to installing, configuring, and getting the most out of BatchWarp.
BatchWarp is a professional Adobe Premiere Pro extension built for editors who work with large, footage-heavy projects and need an efficient, hands-off approach to video stabilization. Instead of manually applying and analyzing Warp Stabilizer on each clip one by one, this plugin automates the entire process — applying effects, running analysis, and saving your project when it's done.
BatchWarp does not replace or compete with Adobe's Warp Stabilizer — it automates it. The stabilization itself is performed entirely by Premiere Pro's native Warp Stabilizer effect, the same way it would be if you applied it manually to each clip yourself. BatchWarp simply removes the repetitive manual work by doing that exact same thing across your chosen track or selected clips, automatically.
Download the installer, open the included README.html file for installation instructions and video tutorials, then run the installer and open Adobe Premiere Pro.
Navigate to the Window menu at the top of the screen, select Extensions, and click on LogicCutPro - BatchWarp.
The plugin panel will open and prompt you to enter the license key you received at the time of purchase. Type in your key and click Activate.
As long as your key is valid and you have an active internet connection, activation will complete successfully. The panel can then be docked anywhere within Premiere Pro's interface — it integrates fully with the workspace like any native panel.
Prepare Your Timeline
Move all clips that need stabilization to a dedicated video track (like Video Track 2, Video Track 3, or Video Track 4), or simply select the specific clips you want to process anywhere on your timeline.
Select the Target Track
At the top of the plugin panel, you'll find an Apply to selector. Choose the track where your clips are placed. The default is set to Video Track 1.
Run the Process
Click Run. From this point, you can step away and focus on other things. The plugin works through your timeline sequentially — applying Warp Stabilizer to each clip, running the analysis one file at a time, and once everything is complete, it automatically saves your Premiere Pro project.
When all files are successfully processed, the Status field turns green and displays Done & Saved, confirming that the project has been saved automatically.
If the plugin encounters a problem with a particular clip, it will wait briefly and then attempt to process that clip again. If the second attempt also fails, the plugin skips that clip, continues with the rest, and reports the issue in the Status field at the end — so you're always aware of any files that may need attention.
One common reason for failed clips is accidentally placing the wrong file on the stabilization track. After long editing sessions, a clip can end up on the wrong track and doesn't match what the plugin expects, which may cause processing errors.
For a detailed breakdown of any issues that occurred during the session, click the View Session Logs button at the bottom of the panel. It opens a dedicated window listing all logged events and errors from the current run.
All default values mirror the native Warp Stabilizer effect defaults in Premiere Pro. Any setting change applies to all clips on the currently selected track.
The plugin remembers your last-used settings even after closing and reopening the panel. To restore everything to factory defaults, click Reset Settings.
Already ran the analysis but need to tweak a setting — say, change the Smoothness value or switch the Method? You don't need to re-analyze everything from scratch. Make your changes and click Run again. The plugin will quickly update all previously analyzed clips with the new values, skipping the analysis stage entirely.
Exception: Changes to the Analysis Mode (Detailed / Fast) require a full re-analysis of all clips, as this setting directly affects how the footage data is processed at a fundamental level.
On large, complex timelines, Premiere Pro's built-in auto-save can become a source of instability. When a project is heavy, auto-save takes significantly longer, puts extra load on your system, and can cause Premiere to hang — which in turn may interrupt the plugin's process. To prevent this, follow the recommended workflow below before running the plugin on demanding projects.
Manually save your project before starting the plugin.
Disable Premiere Pro's auto-save in preferences before clicking Run.
Let the plugin complete its work — it will save the project automatically when finished.
Once the plugin is done, re-enable auto-save in Premiere's preferences.
After analysis and review, if you move your processed clips back down to the main video track and later need to identify which clips have Warp Stabilizer applied — for any reason — the plugin has a dedicated tool for that.
At the top of the panel, you'll find the Select Stabilized Clips button. Choose your target track (or choose 'Selected Clips' to scan the entire timeline), click the button, and the plugin will instantly select all clips that have Warp Stabilizer applied. The Status bar will also display the exact number of clips found.
One license activates on one machine only. Once a key is in use on a computer, it cannot be activated elsewhere without first deactivating it from the current machine. The Deactivate button is located in the bottom-right corner of the panel.
Important: Each license includes one self-service deactivation at a time. If you need to deactivate again, you must wait 72 hours from the previous deactivation before another self-service deactivation becomes available. If you are planning to switch computers, reinstall your OS, or make significant hardware changes — such as replacing your motherboard or storage drive — deactivate the plugin before making those changes, as these actions will alter your Hardware ID.
BatchWarp is built to work with the versions of Adobe Premiere Pro that are current at the time of release. Adobe periodically introduces API changes, updates its extension framework, or revises its platform policies — any of which could affect how third-party plugins operate.
Important: If such changes occur in the future and impact the functionality of this plugin, that falls outside our control and does not constitute grounds for a refund. The product is provided as-is, and we make no guarantees regarding uninterrupted compatibility with future versions of Premiere Pro or any other host application.
In the bottom-left corner of the panel, there's a Contact Support button. Clicking it opens a form where you enter the email address associated with your license and write a description of the issue you're experiencing. After submitting, the panel will confirm whether your message was sent successfully.
Make sure to use the same email address you used when purchasing the license, so we can locate your account and assist you as quickly as possible.
Simple, Transparent
One plugin, one price. No hidden fees, no feature tiers.
3-day free trial · Then $15/month · Cancel anytime
- Full-track and Selected Clips workflows
- Built for wedding films, documentaries, music videos, and long timelines
- Retry / skip handling for problematic clips
- Progress feedback with clear error logs
- For one editing workstation
- Updates included while subscribed
- Windows 10/11 & macOS 10.14+ support
Secure checkout · Payments powered by Lemon Squeezy